Simple But No Simpler
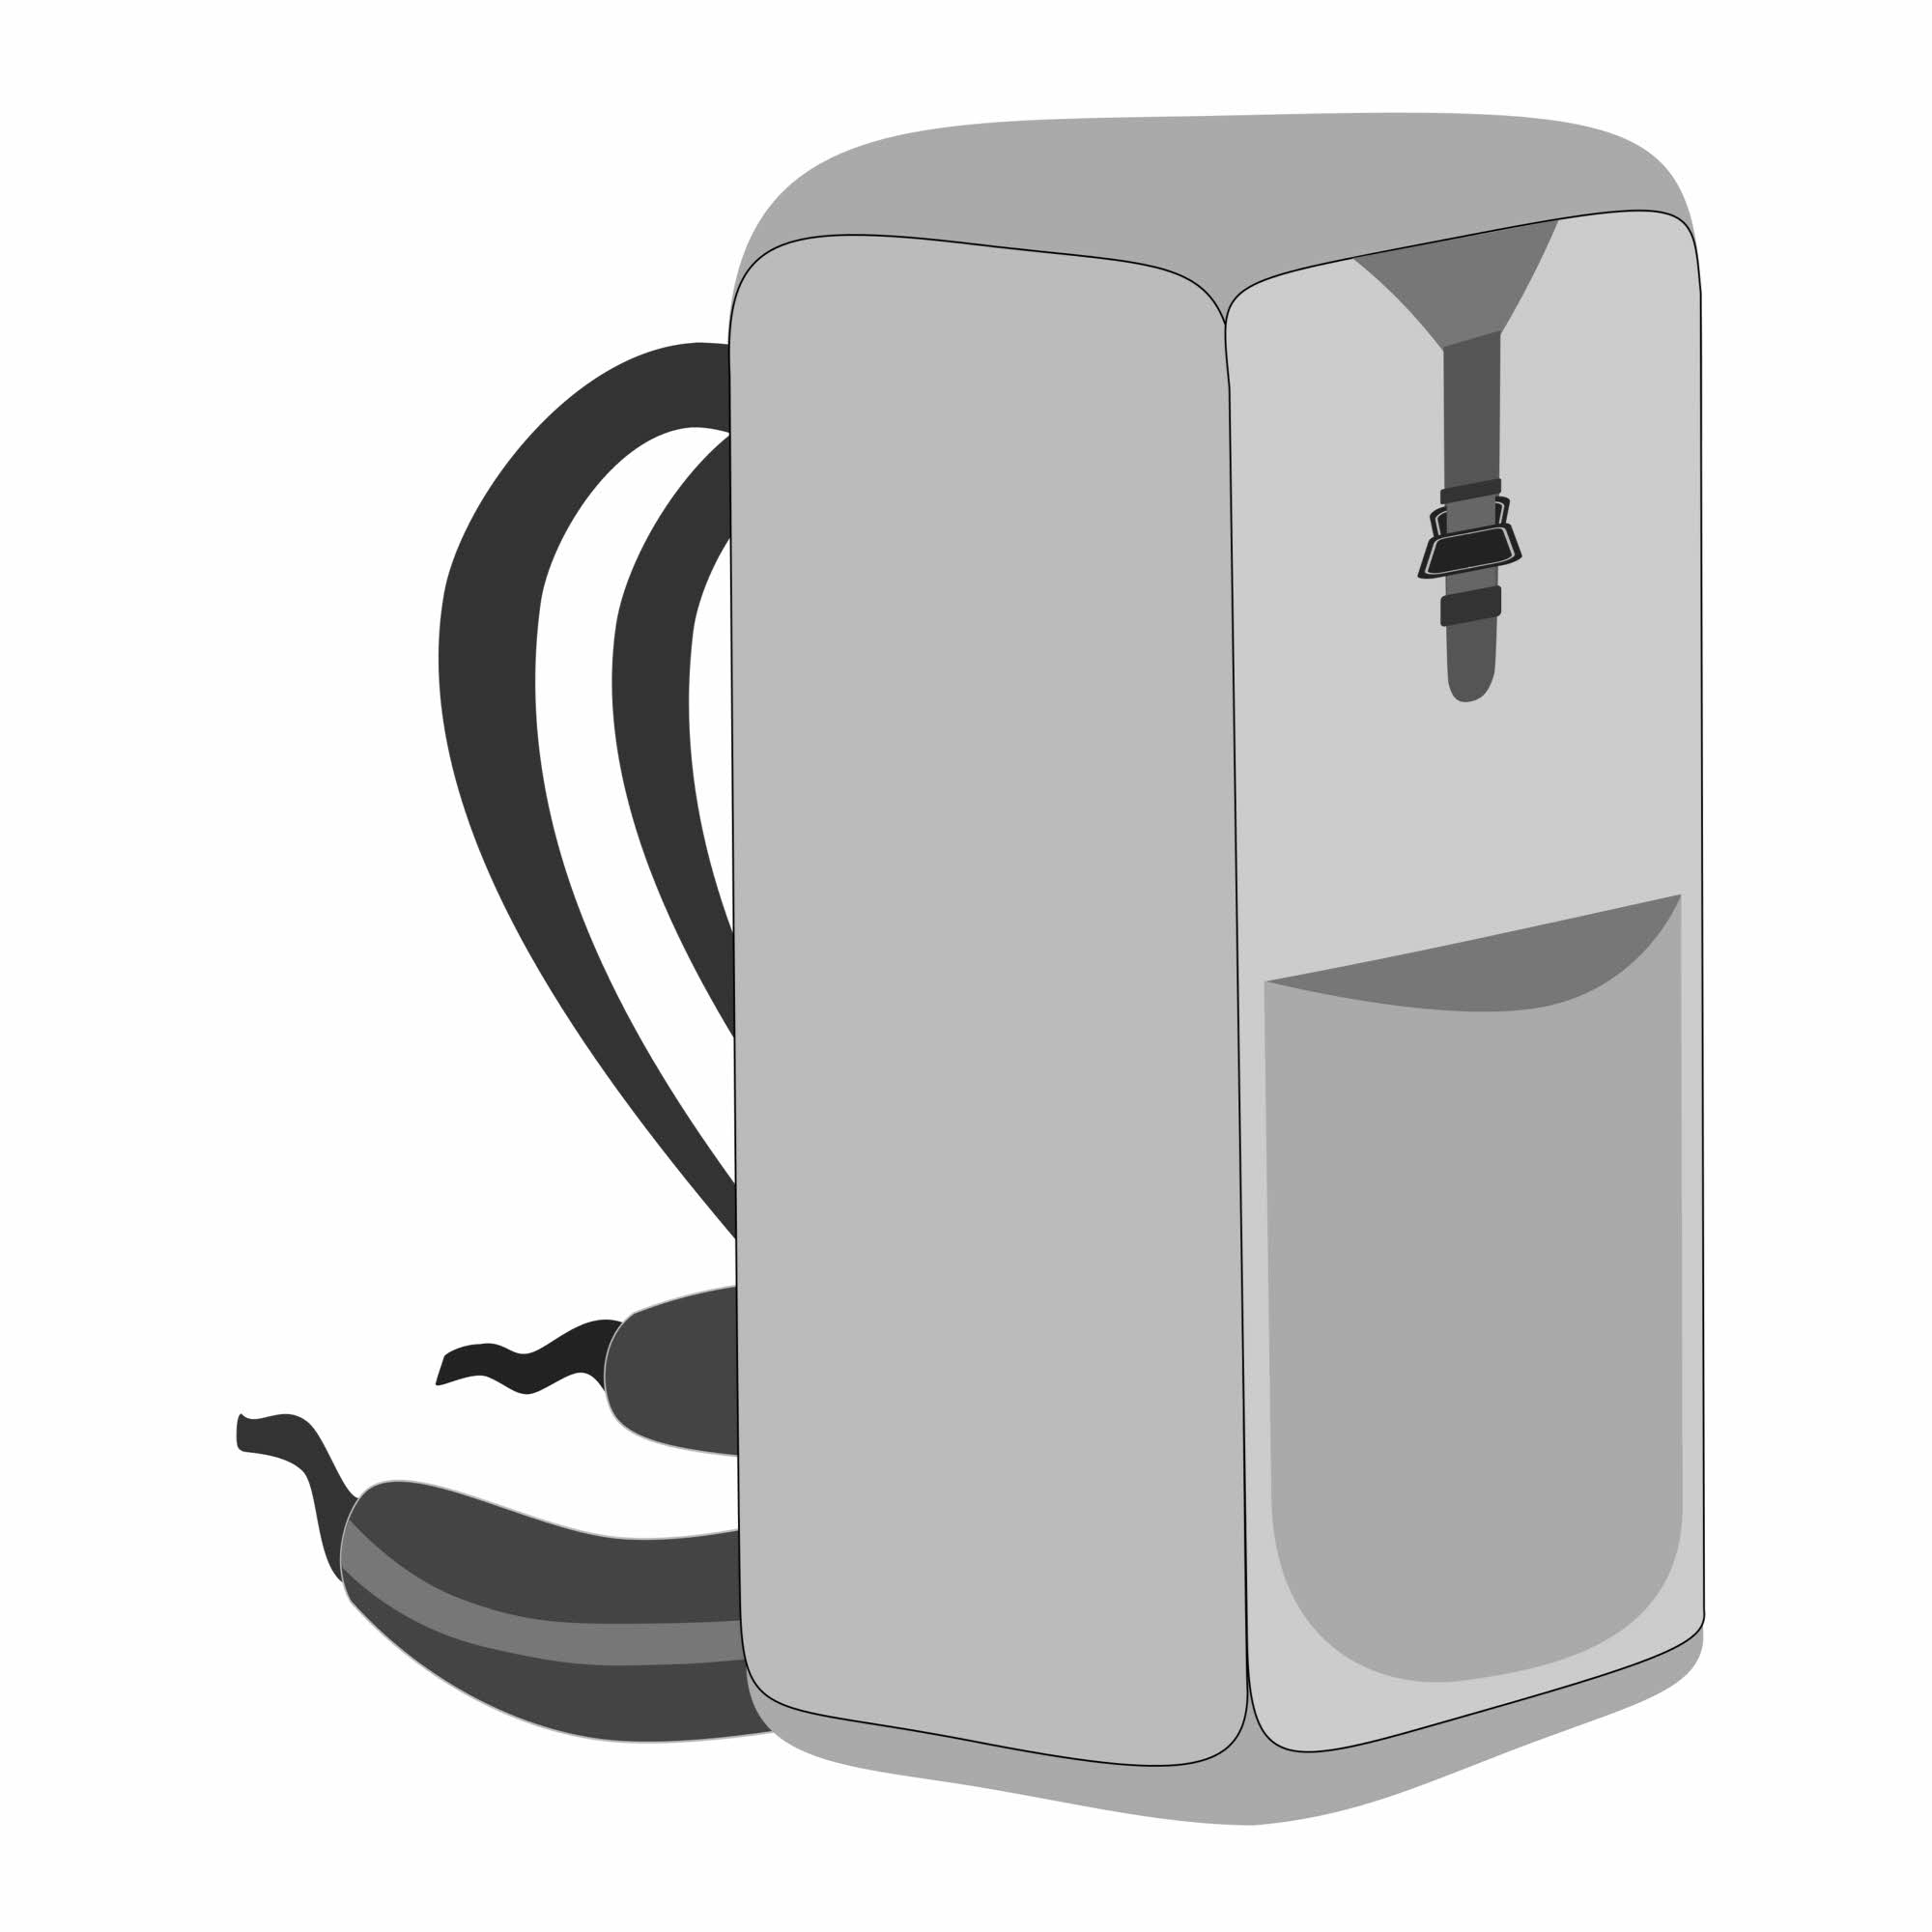
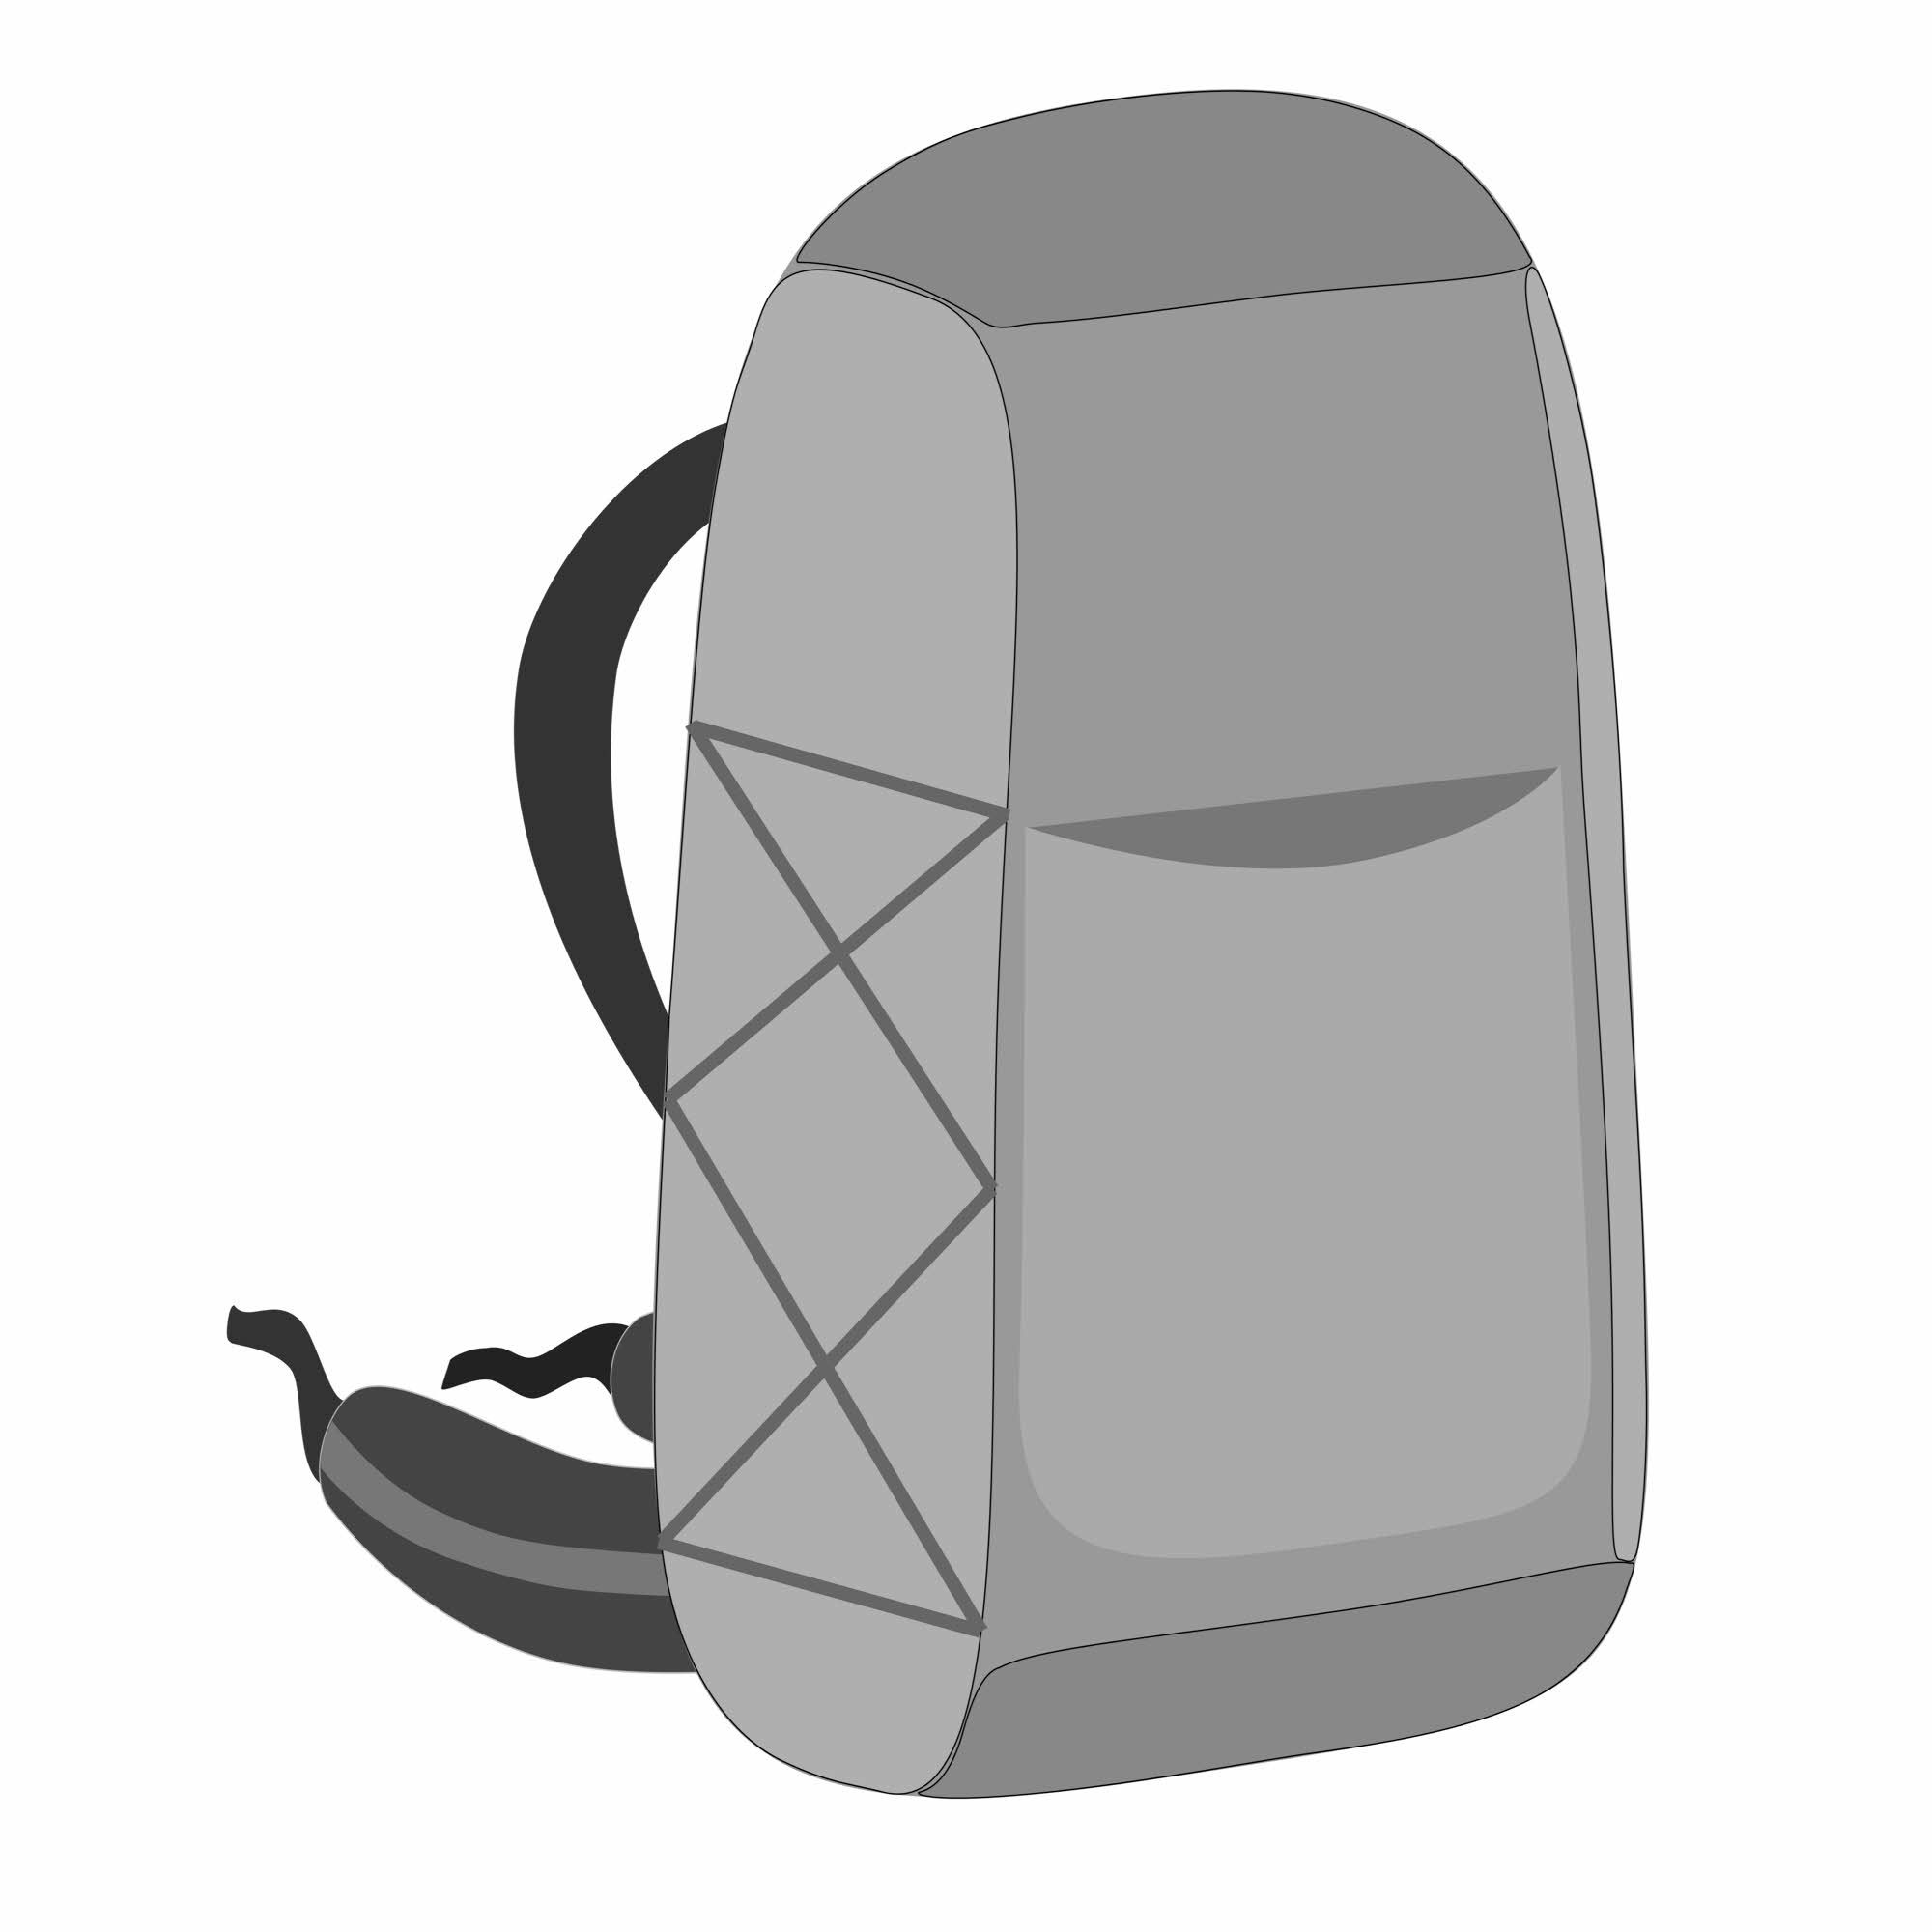
Basic Backpack Components.
– So what really defines a backpack? Eh? –
There isn't much to it, really. You need a bag and a way to attach the bag to your body. But not permanently. Only temporarily.
Temporarily. That's the key word.
No surgery, no stitches or splints, no transgenic experiments with puckered kangaroo tissue. You get to keep your sort of good old, generally-adequate, multi-purpose body with all its fine, familiar organs, and temporarily hang something alien on the outside, and then you get to remove that thing when done, all without the aid of a surgeon, the way you slide out of your jacket when the day turns warm, without needing to have someone cut on you with a knife. This is good.
So. We got past that one but we're still blowing smoke. What's the rest of the story then?
Not much, really. You've heard most all of it already. To go backpacking you need something to carry your stuff in. That something is a pack.
There are other ways to do it, but we are interested in packs.
A pack has a few essential parts. Those parts are a bag and shoulder straps. Throw in a belt of some kind and you're prepared for most things. Well...OK. If you insist, then add a few optionals like an odd strap or two to lash on your pet squeaky toy, and you have the basics wrapped up. We'll get to the optionals toward the end of this chapter.
What's that you say? Do I hear something like Oh, God, this is getting tedious already. I can smell it from here. Right? Wrong? Maybe? Well, read on if you dare and let's see what happens.
– Bag it. –
Right now, if you're still with us, let's take a look at bags.
The pack bag is where you put stuff. You get that. But not all bags are the same. There are some fundamentals.
The material has to be adequate. OK, done.
The bag should extend from up near your shoulders or maybe a little higher to down near your waist and maybe a little bit lower. OK, done again. Good enough for now.
More important is shape. The shape of the pack bag makes a difference.
There are three basic approaches to shape:
- Brick shaped
- Smaller at the bottom
- Smaller at the top
– Brick me in with loving-kindness. –
The brick-shaped pack is the simplest one. A lot of frameless, ultralight packs are like this. This sort of pack is regular and predictable all over, with parallel sides and tidy, square corners. It is easier to make, easier to understand, and easier to load. If the pack is light and the load is light, the shape doesn't matter much, so it's fine to do something simple and straightforward.
– Make my butt look big, please. –
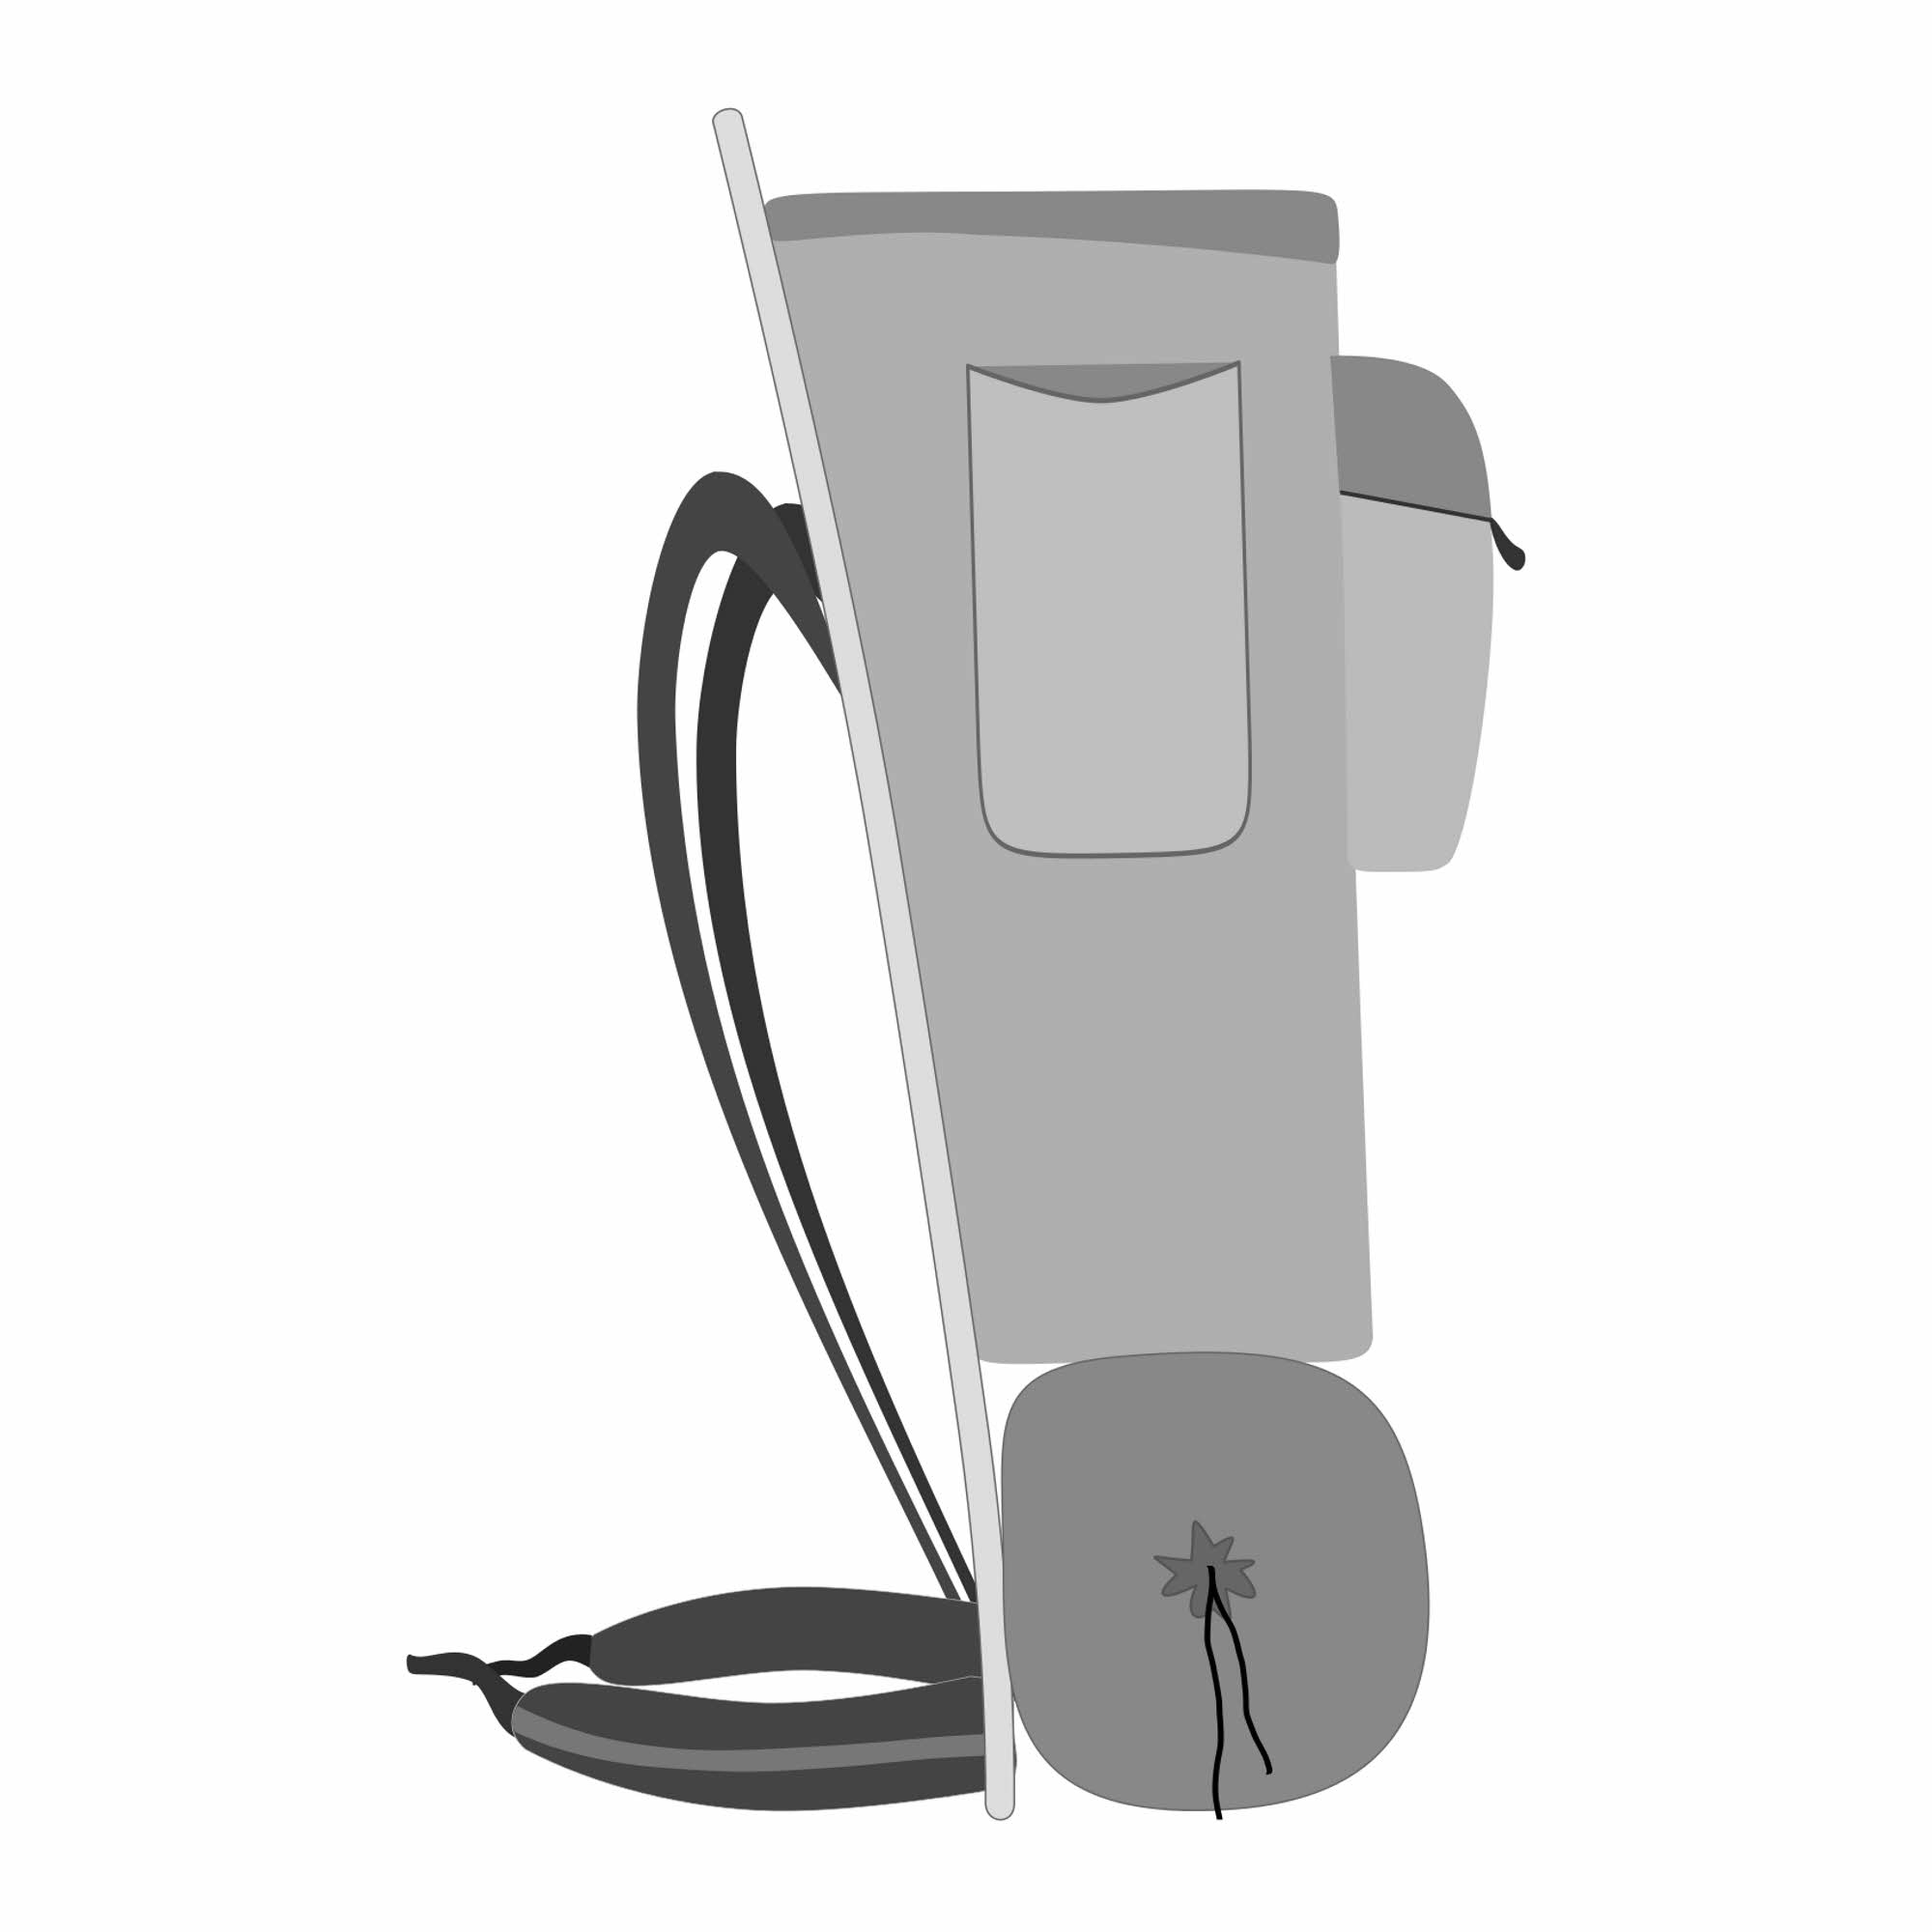
External frame packs are more likely to be like the next variant, i.e., smaller at the bottom. In this context smaller means possibly a bit narrower from side to side, but noticeably and definitely shallower from front to back. Wedge shaped.
Think wedge shaped. Think of a rubber door stop, with the pointy end down.
Smaller on one end means you can't put as much stuff into that end of the pack. External frame packs are especially good for carrying heavier loads on mostly level, mostly smooth trails where you can walk mostly upright and be easily identified as mostly human. Because the bottom of the pack bag is smaller, there is no way you can put as much into that end of it. No matter how hard you try. Even if you are incredibly strong and incredibly stupid. It's fail-safe. Can't do it.
Beyond that, the idea is to put light things like a poofy sleeping bag and spare clothing into the bottom of the pack, while putting heavier things like food, cooking gear, and any of the odd iron bars or spare bear traps you might have with you into the top, where there is more room for them.
This small-at-the-bottom design simplifies your packing technique. The whole point is to get more of the weight up high, near the shoulders, where a slight forward lean will precisely tilt the pack's weight over your center of gravity. Dropping a plumb line from the pack's center of gravity will show that it runs right through your hips, which bear most of the weight. If you can get set up right then you have a pretty easy time walking along and are likely to find yourself whistling a happy one.
– No, make my shoulders look big instead. –
Internal frame packs are mostly larger at the bottom - some more so, some less so these days. So guess where most of the weight goes? Sure, right on your hips (really the pelvic bones). But low. Which hides your butt. This is the smaller at the top idea in action.
External frame packs have large and extremely rigid frames. (Remember?)
Internal frame packs, no. Internal frame packs are different. They have smaller frames that do a good job, but without being as obsessive and rigid about the whole thing. Internal frames act like firm suggestions compared to the external frame's severe commands. So having the weight down low, with limited space on top aids the internal frame pack. This design helps it not to collapse and wad up on you. Anyway, the result is that you can't put too much weight up high. Even if you want to.
It turns out that having weight low is a good idea if you are not on a mostly smooth, mostly level trail. Like if you are off the trail altogether, or maybe doing some scrambling or climbing. Internal frame packs began as a naughty idea in the mountaineering world, where low-down weight is a good thing. Good for climbing, good for scrambling, good for skiing. Not so good for general backpacking.
So guess what most backpacks are like these days. Yep. Like heavy-bottomed climbing packs. Whether they should be or not.
A low center of gravity is more stable and less likely to tip you over when the going is tough and you are twisting around and lurching and grabbing at things (as you might do while trying not to fall to your death). But a low center of gravity is more tiring when all you want to do is simple, mindless backpacking, which is what most people want.
A low center of gravity, down by your hips, means that the weight is hanging off the far back end of your behind. It means that you have to lean forward even more to get the weight of your pack centered over your hips, which is tiring and uncomfortable for walking in a straight line on level ground. Which is what a lot of backpacking is.
And, since most packs load from the top, a pack with more of its carrying capacity deep down at the bottom means your stuff is harder to get at. The traditional external frame pack really has about the same difficulty level, loading-wise, because many of those suckers are just a huge bag with a hole at the top, but at least with them the frame makes a convenient stand to help you during excavation. (Shovel not included.)
Ultralight packs usually have a simple top-loading brick shape, but they are smaller overall, so no matter what, you don't have to reach far. The award for accessibility goes to small packs used by people with long arms.
– Stuffing the envelope. –
One last thought. Keeping weight up high, somewhere near your shoulders, is a good idea when you can make it work. It's easier with a small pack, especially if the pack is even smaller at the bottom, but any pack that is shallower front to back, and relatively wide, is also a good idea. Moonbow Gear's Gearskin happens to be like this.
Here's why it works.
Compare a shoe box to one of those big mailing envelopes. The box, if stood on one of its small ends, is tall and narrow, and...boxy. The envelope, if stood up on one of its short sides, is tall and wide and flat. Not boxy.
See where we're going?
If your pack bag is more like the envelope then the load you carry will wrap around you a bit, and since the envelope shape is not very thick, more of the weight will stay close to your body. There are two good things here - wrap around you and stay close to your body. These two things work together. More of the weight stays near the real you, where it is easier to carry because it has less leverage to twerk with your balance.
Take a look sometime. You'll see a lot of people stumbling around with packs the size of small refrigerators. That's what you don't want. You don't want a pack stuck on like an afterthought, and hanging way out behind. You don't want some big heavy thing way out there sort of vaguely following you, jiggling and swaying and banging around, loosely attached by a few rusty bolts. And not the trailer hitch either.
With less stuff, and lighter, smaller stuff, everything is miniaturized - your effort, the complexity, the weight, the cost. Get the picture? Even if you have all your goodies in a boxy pack, but you are going light, that is still a small, light package. If you have everything stuffed into a small, flat, wraparound sort of pack, so much the better.
– Frame it. –
The frame is another basic component. We've been over this already, but there's nothing like being tedious to make any day seem longer, so let's plow ahead mindlessly, 'K?
What's good about a frame is that it gives shape to the pack and distributes weight in a predictable way. This makes carrying a load easier. A good frame flattens the pack bag and keeps the load closer to your body. It helps you move the weight up high or down low, depending on what's right for current conditions. A frame keeps pressure and weight off sensitive parts of your body and puts that pressure and that weight where you don't care about it. As much.
What's bad about a frame is that it adds its own weight and keeps you from radically reconfiguring the pack in case you have almost nothing to put in it. The added weight is inescapable. It's weight. Dead weight. You can't use the weight of a frame for anything else. Unlike the weight of extra food, the weight of a frame won't help you stay out longer or go farther. Unlike extra clothing a frame's weight won't keep you warmer. It's only weight. Period. Weight is always bad. Always.
An external frame pack provides extra ventilation between itself and yourself, because that's part of the design. But then the pack's weight is farther from the essential you, mostly out behind. (Jiggle and sway time again.) And any frame keeps a less-than-full pack from slumping like an old pillowcase. Frames do this. But if the pack isn't full, then you're have too much pack for the job. Right? And you can't shrink a pack frame to fit a shrinking load, right?
On the other hand, a frameless pack has advantages. It is lighter, which is the number one advantage - no frame, no extra weight. And it's smaller, usually. You want to carry less, and carrying less is the opposite of carrying more, so using a smaller pack gets you going in the right direction. Part of that is leaving out the frame.
A frameless pack adapts better to changing loads. Use up your food, cinch up the straps, and scrunch the whole thing down into the tiny-small range, unlike a pack with a frame. And with careful loading and intelligent use of compression a frameless pack can be rigid. While remaining so very light.
If you establish a base camp and take day hikes from that location you can use your frameless backpack as a day pack, which you aren't going to do with a framed pack.
– Shoulder it. –
Packs like to hug people, and shoulder straps let them do it gracefully. Good straps on a pack supply friendly, cozy hugs all day. Packs need hugs and so do you. Get huggy, do it well, and you will be a better backpacker. Happier too.
There are strap variations. Padded versus not, and straight versus shaped.
Padded straps: Most shoulder straps are padded. There is a reason for this. The reason is that padding helps the strap conform to the shape of your body. By doing that it spreads weight over a larger area of your body. This eliminates painful pressure points, which your body hates. An unpadded strap hits the high points, concentrating pressure there. The high points are where mostly bones are and where not much else is, so you have concentrated pressure and nothing to absorb it, which is...Zow! A pressure point. Pain follows, becomes unbearable in just a little bit, and doesn't quit. Try getting to this point in the first half-hour of a week-long trip. Then you'll see.
Unpadded straps: Gossamer Gear makes or made (depending on what they're up to this week) some packs with hollow shoulder straps intended to be stuffed with spare socks. Or with optional foam padding. Spare socks are lumpy and make you hurt, if you're at all normal. No padding at all makes you hurt more, though a few odd people manage to make either no padding or socks work, somehow. Without padding the shoulder straps bunch into two narrow, angry, ropelike twists that concentrate the weight in a spectacularly disagreeable way. All that weight digs right into your collar bones, which begin screaming, within seconds, and don't quit. Unfortunate. Especially if you find that this experiment has failed a scant 20 steps past the trailhead. On Day One.
Foam padding, however, spreads weight over the top of the whole shoulder, both the high points and the hollows, and keeps the strap at full width. Comfy. (Comfy is the opposite of agony. Remember that.)
Straight straps are simpler and need less material, so they're lighter. They don't fit as well, but work well enough if you carry only a little weight.
Shaped straps form lazy S curves that follow body contours and fluidly flow around your shoulders, your neck, your torso, and down to the bottom of the pack, which is their second attachment point. Shaped shoulder straps spread weight more evenly over the shoulders, the upper chest, and along the rib cage. Their shape helps them twist 90 degrees as they head south, so they can lie flat on both your shoulders and your ribs, not to mention against your back, which is their upper attachment point. The gentle twisting and turning they do (and the lying-flat part) are also convenient for anchoring a sternum strap, since everything is nice and tidy with shaped straps.
– Being a fan of belts. –
Everyone wants a belted pack. Sometimes you need one. Sometimes you don't, but you want the option. Let's be clear and say that there are two different belts. One is a hip belt and one is a waist belt.
There is a difference. (Yes, we did all this before. Cool your jets.)
A waist belt is like an ordinary belt for pants but doesn't necessarily hold weight or keep your trousers in place. Most day packs have one of these belts. You can use it every now and then to hold up some of the pack's weight, but not too well. It's too narrow, and hurts your tender tummy. Tummy is the key word. And tender is too. The tummy is always a tender place.
Most waist belts are found on day packs. Day packs are short. Add a waist belt to a day pack and you have a belt that will go around your tummy region because that's as far down as it reaches - nowhere near your hips. Where it does reach is the place where you stored lunch after chewing it, and where some potentially useful flab is kept, and where you are ticklish. But it is not where you can hang much weight without feeling bad about it. Tummies? Tender. Narrow belts are not tender. They dig and bite, hard. Ow.
Ow! Ow! Ow!
But waist belts are light.
Light! Light! Light!
There is almost nothing to a waist belt, but waist belts are strong and really good at one thing, which is stabilizing a pack. A belt of any kind keeps a pack from swinging around and throwing you off balance, especially if you are off the trail, on rough ground. A belt also keeps the pack on your back.
Say you are scrambling around through brush, or squeezing between rocks. A belt keeps the pack from getting pushed out of place. The pack stays right on your back where you want it. Or if you bend forward way far. Way, way far. The pack stays put. It does not tip and flip and slide and come to rest on the back of your head, and it does not go over your head. You are, remember, experienced and have a reputation to maintain, so you cannot let this happen. Thus if you remain belted, you remain well secured and dignified-looking.
Or say you take a little tumble. Also not a professional-class move, but the world will try to trip you up now and again, if only to show that it is smarter than you are. If you are belted, your pack will not race off across the landscape without you, in a downward way, sucked hard by gravity. Instead your pack stays on your back, which is good because you have enough problems without having to chase a pack into the next county, or get it wrapped around your face, or tangled in your legs. Especially if this is your day to be attacked by a pack of angry bush weasels who are pissed to find you intruding on their home turf.
– The hipster. –
Now a hip belt is wider and thicker and rides lower than a waist belt. A hip belt needs to wedge itself down onto your pelvis right above your hip joints if you expect to have a happy relationship. This here region is all sturdy bone, doncha see, the biggest chunk of solid bone in your whole body.
The pelvis forms a big ring.
Up top, to the back, your spine comes in, supporting your whole upper half. On the bottom side your legs plug in, at the hip joints, attaching your whole lower half. The pelvis is the middle, where everything sockets together, so it has to be strong, and it is, and is a handy shelf to rest a pack on too.
Which is why hip belts were invented. The hip belt is designed to support your backpack from the bottom up, and to transfer the pack's weight to your skeleton. To do this it has to be big enough to solidly attach both to the pack and to you, and it really likes the solid feeling that your pelvis gives it.
On the pack side, the hip belt needs to be big enough to spread the stresses around, so it won't separate from the pack. Sewing the hip belt on at one small spot would be pointless because of the stresses. Stresses capable of ripping the belt from the pack the very first time they go outside to play, the way a family of ravenous wolves is capable of ripping a little bunny off a suburban lawn. So the belt has to be wide, and solidly anchored by the cleverness of many stitches.
Wide is good for your body too, for the same reasons.
If the hip belt has more surface area then it has a larger area to use in contacting your body. This results in less pressure on any one part of you. Take 30 pounds (14 kg), which most people would say is either a light backpack load, a moderate one, or a decent meal. Hang that weight by a rope from your neck and you feel a world of hurt. Good example.
But hang that weight from a pair of shoulder straps and support it with a capable hip belt and you can pretty well walk all day without feeling much of anything unpleasant. If the pack is designed well then most of that weight will pass into your body through the hip belt and you will feel some anonymous cozy pressure. Like a hug, remember? But lower than most hugs. An intimate hug, which is fine too, if you keep your pants on.
All this works because weight is spread over a large area.
Let's say that the hip belt is four inches high by 32 inches long and supports 25 of those 30 pack pounds by routing that weight through your body. That amounts to about 0.2 pounds of pressure per square inch, a hair over three ounces (around 0.14 g per square millimeter). That isn't much pressure as things go, regardless of what the exact numbers might be. You can handle it. It is well within your comfy zone.
This is good.
A hip belt has another advantage. It is thick.
Being thick means that it is full of delicious padding. Padding is good. Padding is good because it is soft and conforms to the little peculiar bumps and particular contours of your very own body. This distributes the weight even more evenly. No hot spots, unlike a simple piece of webbing, which is really a long, narrow, ill-tempered, continuous hot spot with teeth.
The downside?
Is that a wide and thick hip belt is heavy. And on a light pack it adds bunches of weight to the pack, percentage-wise. The lighter the pack, the less you need a hip belt because you don't have weight to carry, anyway. Just the hip belt from a heavy pack can weigh many times more than an ultralight backpack.
True.
– Make a wish upon a strap. –
A sternum strap or chest strap pulls the two shoulder straps together over your chest.
This is optional but usually adds comfort. A whole bunch of comfort. Simple and straight shoulder straps benefit more from a sternum strap than the anatomically contoured, S-shaped ones, but don't match up so well with it.
Depending on your body shape and your pack's design, as noted earlier, your shoulder straps might want to slide away from each other and slip off your shoulders. This happens more with straight straps. A sternum strap prevents the slip-sliding and helps to distribute pressure across your chest rather than concentrating it on the tops of your shoulders. The strap also stabilizes the pack the way that a belt does, and ensures that the pack stays with you no matter what.
More strappiness.
Load lifters (or load levelers, or load stabilizing straps) connect the top of the shoulder strap to the top of the pack. These are also optional. Most ultralight packs don't have them, and don't need them. Like everything else that's important in life, whether or not you need them depends on you. They may be more trouble than they're worth. Or worth their weight in glazed donuts with bacon sprinkles. It all depends.
These lifter/leveler straps pull the top of the pack forward, helping to balance it by keeping it closer to your body, so the weight carries better. Loosening them allows the pack to lean backward, away from your body, for those times when you need a little extra air in there. And besides balance, the load stabilizers change the shape of the pack.
This is most noticeable with a frameless pack. Frameless packs tend to be pretty straight and uncontoured when packed full, and the human body isn't. Pulling the load leveler straps tight bends the top of the pack forward to curve the pack over the shoulder blades so that it is a better match for the contours of the body. This makes the pack more comfortable, makes the pack carry better, and keeps the pack more stable.
More sophisticated packs are already made that way. Contoured, that is. And you can tune an internal frame pack to your very own shape by bending its flexible frame stays to suit. (If it has tunable stays, which a lot of these packs do have.) Larger, bulkier, heavier packs meant to carry heavy loads are both more rigid overall, and also have more adjustments, because a small tweak makes a big difference when dealing with heavy weights, which, if only a bit off, will send you right to hell.
– The short strap for the short haul. –
Finally, the haul loop, back for an encore. One strap, one job.
Sure, this is still tedious, but let's not ruin our tedious streak by being fresh and innovative at this late stage. Anyway, we're almost done. In a minute we can get to those bacon donuts.
So, back to haul loops.
Not enough people know about haul loops, or use them. Once you know about them you can still ignore them, but at least you'll be able to sound smart when you need to open your mouth and make noise.
The haul loop is a handle. It is designed to take the strain of lifting the pack whenever the pack is not on your body but you need to move it or lift it. If you're extra cautious you can also use a haul loop to relieve strain on the shoulder straps while taking off the pack or putting it in, especially if you have an ultralight pack made of superlight materials.
Grabbing a full pack by a shoulder strap puts an evil amount of strain on one side of one strap, and can destroy stitching. If not right away, then after you do it a hundred times. Maybe this is all right with you, but using a haul loop is better, and less likely to damage a pack. The haul loop is centered between the two shoulder straps so when you lift the pack with it you pull straight up. This is good. It keeps stresses balanced.
About the worst that can happen while pulling on a haul loop is that you damage the haul loop. If so, then the shoulder straps are still there and safe, and you can still hike around like crazy without worrying about one of them ripping out. And haul loops, because of how they're made and where they are positioned, are very hard to damage, and it's really tough to hurt a pack while using one of them.
The haul loop is also a dandy place to tie a rope in case you ever need to climb over something and then pull your pack up after you, or lower the pack and then climb down to it. The haul loop is there in the center of things and you are less likely to lose your pack than if you tie your rope onto something else. Like a thing that will rip off.
If you ever want to hang your pack the way you hang food, guess what?
No, guess.
Yep. Haul loop.
It's right there. Take that pack full of odors and salty, dried sweat, and hang it up. Get all that residual food smell off the ground, away from you, and keep those tasty, salty bits well above the reach of critters that go mad for salt. Using the haul loop.
It works, and your pack will love the gentle handling you give it. Listen closely. You may be able to hear it purr.